
Why Are My New Hydraulic Brakes Rubbing? 7 Causes and How to Fix Them
You install a new hydraulic brake, spin the wheel, and hear a light scraping sound. The first thought is usually: Did I install something wrong?
Not necessarily. A little rubbing can happen when new brake pads are settling in, but rubbing can also point to rotor alignment, caliper position, insufficient clearance, or the wrong mounting hardware.
The important part is figuring out what kind of rubbing you are hearing before you start changing parts or riding normally.
Quick Answer: Why Are My New Hydraulic Brakes Rubbing?
A light rubbing sound from a newly installed hydraulic brake does not automatically mean there is a problem. New brake pads may need a short bedding-in period, while a slightly misaligned rotor or caliper can also create occasional contact.
However, continuous scraping, strong wheel resistance, excessive heat, visible contact between the rotor and caliper, or noticeably reduced braking performance should not be treated as normal.
The seven causes worth checking first are:
- 1New brake pads are bedding in.
- 2The brake rotor is slightly misaligned.
- 3The caliper is not centered correctly.
- 4Rotor or caliper clearance is too small.
- 5The wrong spacer, bracket, bolt, or washer setup is being used.
- 6The brake rotor is bent or has noticeable lateral movement.
- 7The caliper or mounting bracket was installed incorrectly.
1. New Brake Pads May Need to Bed In
This is the easiest one to overlook because the brake is brand new.
New pads and a rotor do not always have a perfectly matched contact surface from the first rotation. During the initial riding period, the friction surfaces gradually settle into each other. Depending on the brake, rotor, pad compound and installation, you may hear a light rubbing or scraping sound.
What Does Normal Bedding-In Noise Usually Look Like?
Usually Less Concerning
- Light or occasional rubbing
- The wheel still rotates normally
- No obvious loss of braking performance
- No unusual heat from the brake
- The noise gradually becomes quieter
Needs Inspection
- Constant loud scraping
- The wheel is difficult to rotate
- Strong resistance when the wheel spins
- The rotor visibly contacts the caliper
- Abnormal heat or a burning smell
There is an important distinction here: light bedding noise is not the same thing as a brake that is physically dragging hard.
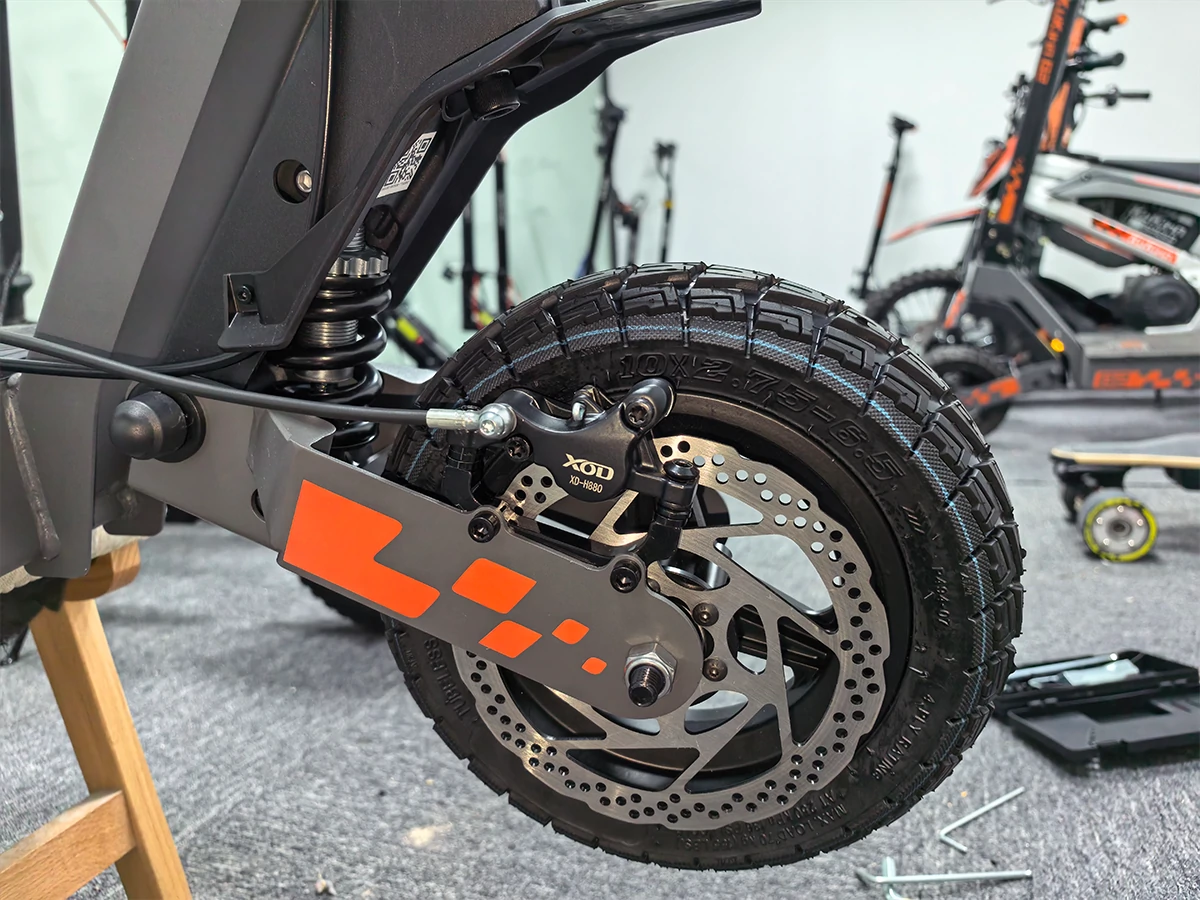
2. The Brake Rotor May Be Slightly Misaligned
If the rubbing happens at one particular point every time the wheel makes a full rotation, look at the rotor before blaming the hydraulic brake itself.
How to Check the Rotor
- 1Safely lift the wheel so it can rotate freely.
- 2Turn the wheel slowly by hand.
- 3Watch the rotor as it passes through the caliper.
- 4Look for noticeable side-to-side movement.
- 5Listen for rubbing that happens at the same point in every rotation.
A little noise does not automatically mean the rotor is bent. What matters is whether you can see noticeable rotor movement or whether the rotor repeatedly contacts the brake pads or caliper.
3. The Caliper May Not Be Centered
This is one of the most common things to check after a hydraulic brake upgrade. The rotor needs to pass through the caliper with enough clearance on both sides.
If the caliper sits too far to one side, one brake pad may be noticeably closer to the rotor. That can create continuous rubbing even when the rotor itself is straight.
Signs of an Off-Center Caliper
- The rotor sits noticeably closer to one pad than the other.
- The rubbing continues even after the initial bedding period.
- The wheel has more resistance than expected.
- The noise changes when the caliper position is corrected.
Before tightening everything down, always look through the caliper and confirm that the rotor is running through the intended opening rather than being pushed against one side.
4. Rotor or Caliper Clearance May Be Too Small
This becomes especially important on electric scooters. A hydraulic brake that physically bolts onto the scooter is not automatically a correct fit.
You also need to consider the rotor diameter, rotor position, caliper width, mounting bracket, fork or swingarm structure, wheel position and available clearance.
A brake that mounts is not necessarily a brake that fits correctly.
The rotor needs to sit in the correct position relative to the caliper, and the caliper itself must have enough clearance from the wheel, tire, bracket and surrounding structure.
This is also why it is better to confirm the actual vehicle configuration instead of choosing a hydraulic brake only because the model name looks compatible.
If you are unsure about your scooter, see the XOD Hydraulic Brake User Manual & Installation Guide or contact XOD with clear photos before ordering.
5. The Wrong Spacer or Mounting Hardware Can Cause Rubbing
This is where a small piece of hardware can make a surprisingly large difference.
A rotor spacer changes the rotor's position relative to the caliper. A washer changes the position of the caliper relative to its mounting bracket. The wrong bracket can change the entire mounting relationship.
So if a new hydraulic brake suddenly rubs after installation, do not only look at the brake pads. Check the complete hardware stack.
- Correct brake model
- Correct rotor diameter
- Correct caliper bracket
- Correct bolts
- Correct metal washers
- Correct rotor spacer
- Correct caliper position
Why Spacers Matter: A Real KuKirin G2 2026 Example
The KuKirin G2 2026 is a good example of why installation details matter. The scooter uses 160 mm brake rotors on both the front and rear wheels in our tested setup, but the front wheel requires a 4 mm rotor spacer while the rear does not.
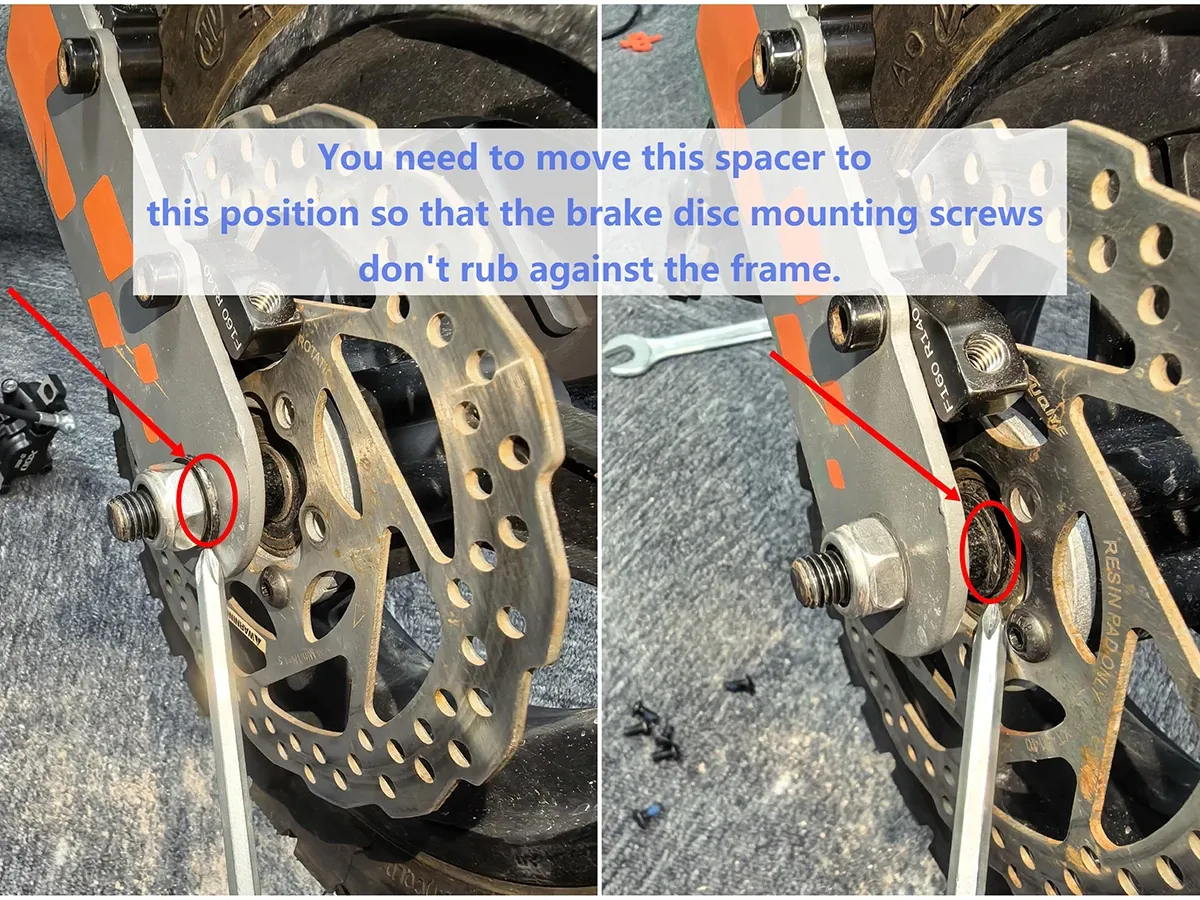
The important point is that the spacer is not a replacement rotor. The original rotor remains in place; the spacer changes its position relative to the caliper.
G2 2026 Caliper Washer Position
The 2026 G2 also has a mounting detail that is easy to miss if you have previously worked on an older G2. For the tested 2026 setup, the original KuKirin caliper bracket, original bolts and original metal washers are reused.
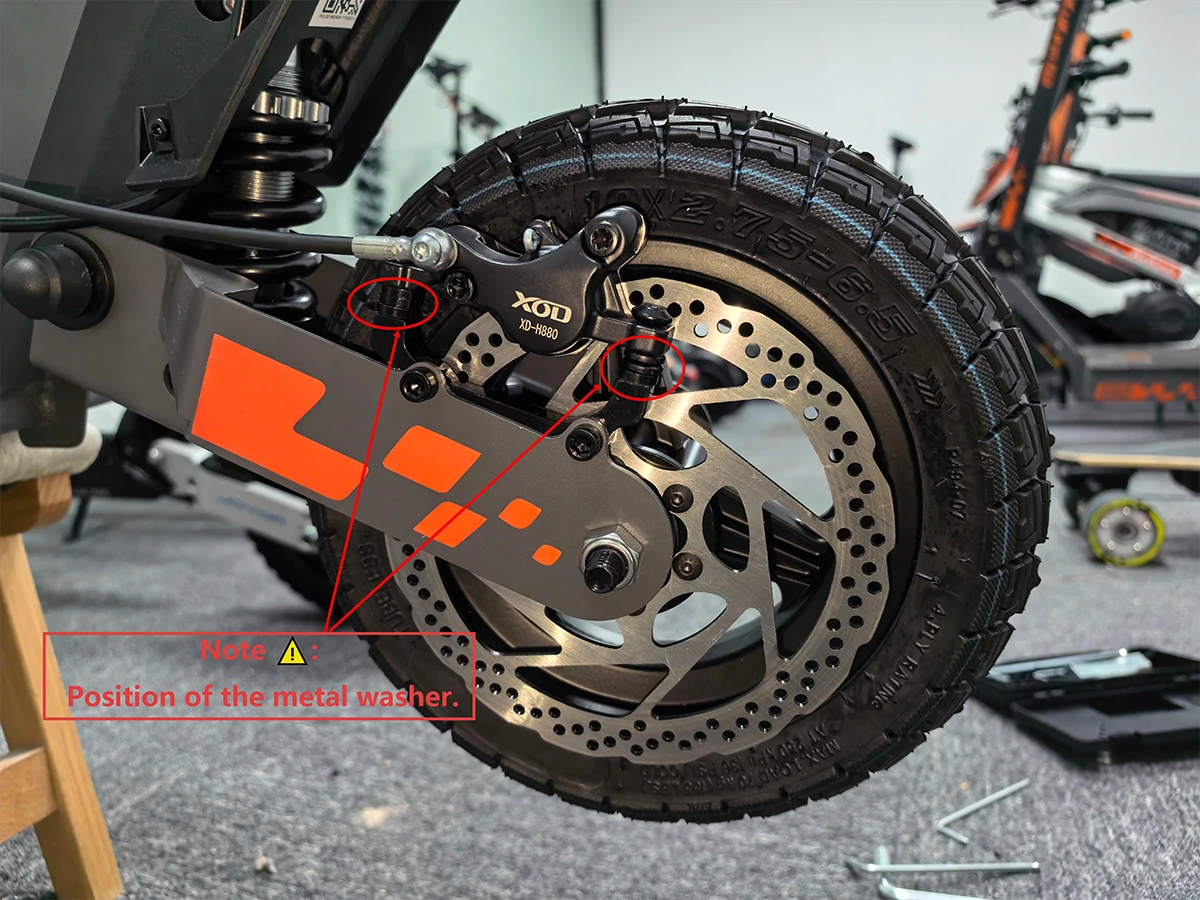
Do not copy the older G2 bracket setup onto the 2026 model. For the G2 2026 configuration tested by XOD, do not use the XOD-supplied caliper bracket.
Reuse the original KuKirin caliper bracket, original KuKirin bolts and original metal washers. The metal washers should be positioned between the XOD caliper and the original KuKirin bracket.
6. The Brake Rotor May Be Bent
If the rubbing happens once per wheel rotation, a rotor with noticeable lateral movement is another possibility.
A Simple Check
Rotate the wheel slowly and watch the rotor as it passes through the caliper. You are looking for obvious side-to-side movement rather than trying to judge tiny variations by eye.
If the rotor visibly moves toward one side and then back again, or repeatedly makes contact at the same point, the rotor and its mounting should be inspected.
Do not try to solve every rubbing problem by bending the rotor by hand. If you are unsure whether the rotor is damaged or incorrectly mounted, have it checked by a qualified technician.
7. The Caliper or Mounting Bracket May Be Installed Incorrectly
A hydraulic brake installation has several parts that have to work together. The caliper itself may be perfectly fine while the bracket, washer or spacer arrangement is wrong.
Before Final Tightening, Check These 7 Things
- Brake model matches the wheel position
- Rotor diameter is correct
- Bracket matches the tested installation
- Bolts are the correct ones
- Metal washers are in the correct position
- Required spacer is installed
- Rotor passes through the caliper with proper clearance
One simple habit can save a lot of troubleshooting: rotate the wheel by hand before you consider the installation finished.
60-Second Hydraulic Brake Rubbing Check
If you have just installed a hydraulic brake and hear rubbing, work through this quick check before changing anything.
Do This Before Your First Normal Ride
Rotate the wheel by hand.
Check whether rubbing is occasional or constant.
Observe the rotor through the caliper.
Look at pad and rotor clearance.
Check caliper position.
Check bracket, washers and spacer.
Perform a controlled low-speed test.
If the wheel spins normally and the light noise decreases during the initial bedding period, the situation may be less serious than it first sounds.
When Is Hydraulic Brake Rubbing Normal?
There is no single noise that can be labeled “normal” for every brake. The better approach is to look at the whole situation.
Usually Less Concerning
- Light, intermittent rubbing
- Wheel rotates freely
- Braking feels consistent
- No unusual heat
- No visible damage
- Noise gradually decreases during initial use
Check Before Riding Normally
- Continuous heavy scraping
- Wheel is hard to spin
- Strong brake drag
- Rotor visibly contacts the caliper
- Brake becomes unusually hot
- Braking performance changes
The key is not simply whether you can hear a sound. It is whether the brake is functioning normally and whether the rubbing is getting better or worse.
When Should You Stop Riding?
Brake noises are worth investigating because a brake problem is not something to “test out” at full speed.
- The wheel is difficult to rotate.
- The rotor is continuously pressing against the caliper.
- The brake becomes unusually hot.
- You notice a burning smell.
- Braking performance changes significantly.
- You see hydraulic fluid leaking.
- The brake lever feels unusually soft, spongy or inconsistent.
- You see visible damage to the rotor, caliper or mounting hardware.
A soft or spongy lever is a different problem from simple rotor rubbing. If the hydraulic system has been opened or air may have entered the hose, see the XOD Hydraulic Brake Bleeding Guide rather than trying to solve a hydraulic problem by adjusting the caliper.
Real XOD Test: KuKirin G2 2026 Hydraulic Brake Installation
One reason we wanted to write this guide is that brake rubbing is much easier to understand when you have actually installed the system on a scooter instead of only looking at a product specification sheet.
We recently installed an XOD H-Series setup on a KuKirin G2 2026. The scooter uses 160 mm rotors on both wheels, but the installation still requires a few details that are easy to miss.
Tested G2 2026 Configuration
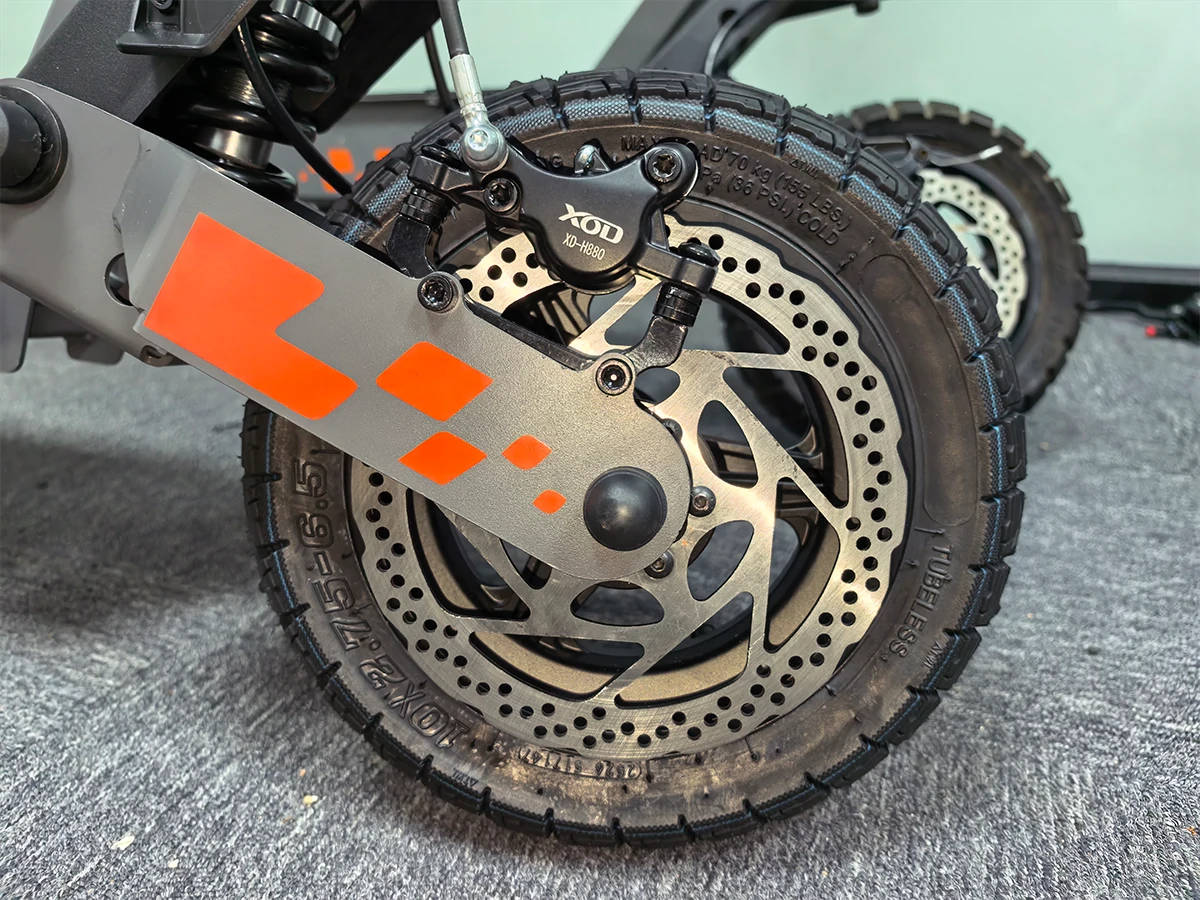
Front: H880 + Original 160 mm Rotor + 4 mm Spacer
The front wheel is the part that needs the most attention. The original 160 mm rotor is retained, and a 4 mm rotor spacer is used on the front wheel.
The spacer changes the rotor position so the hydraulic caliper has the required clearance. It does not replace the original rotor.
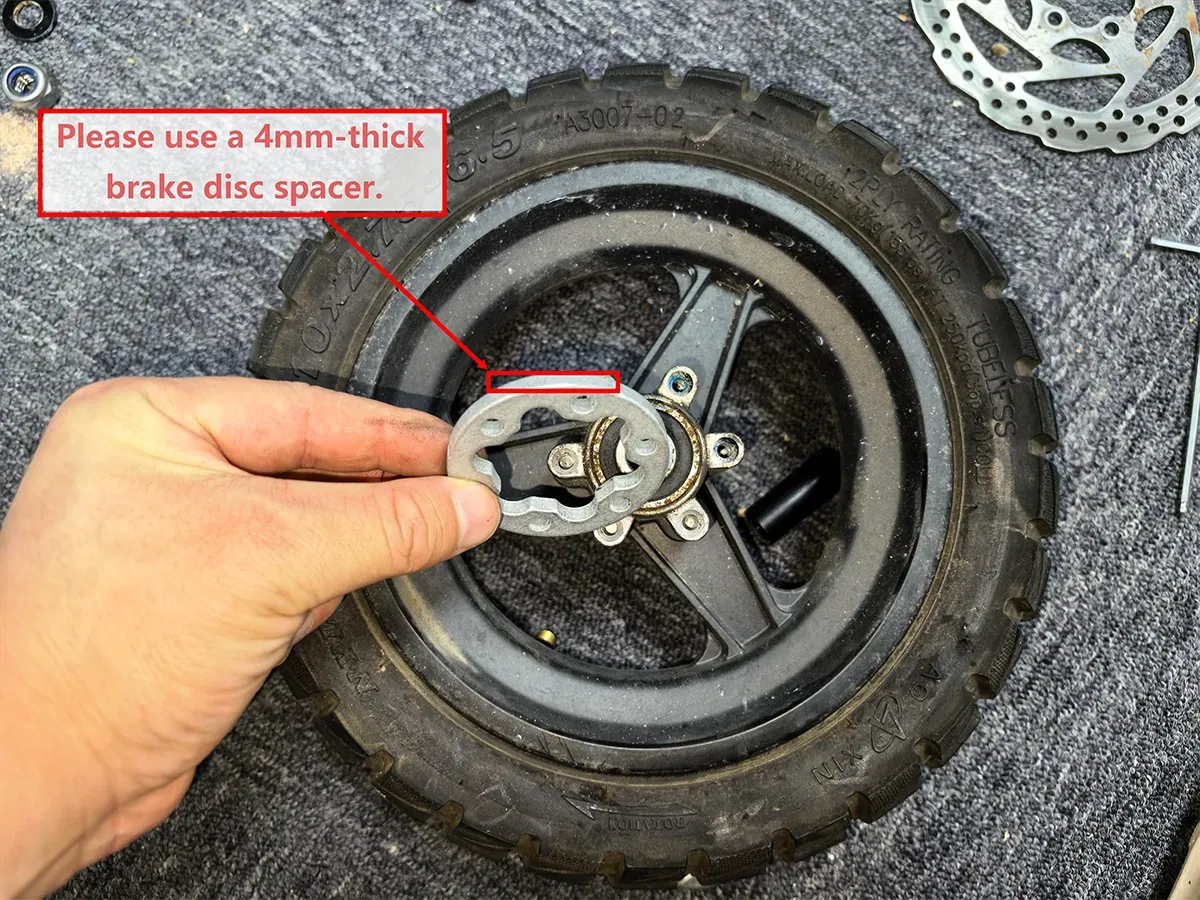
Rear: H800 + Original 160 mm Rotor
The rear setup is more straightforward in the tested G2 2026 configuration. The XOD H800 is used with the original 160 mm rear rotor, and no additional 4 mm rotor spacer is required.
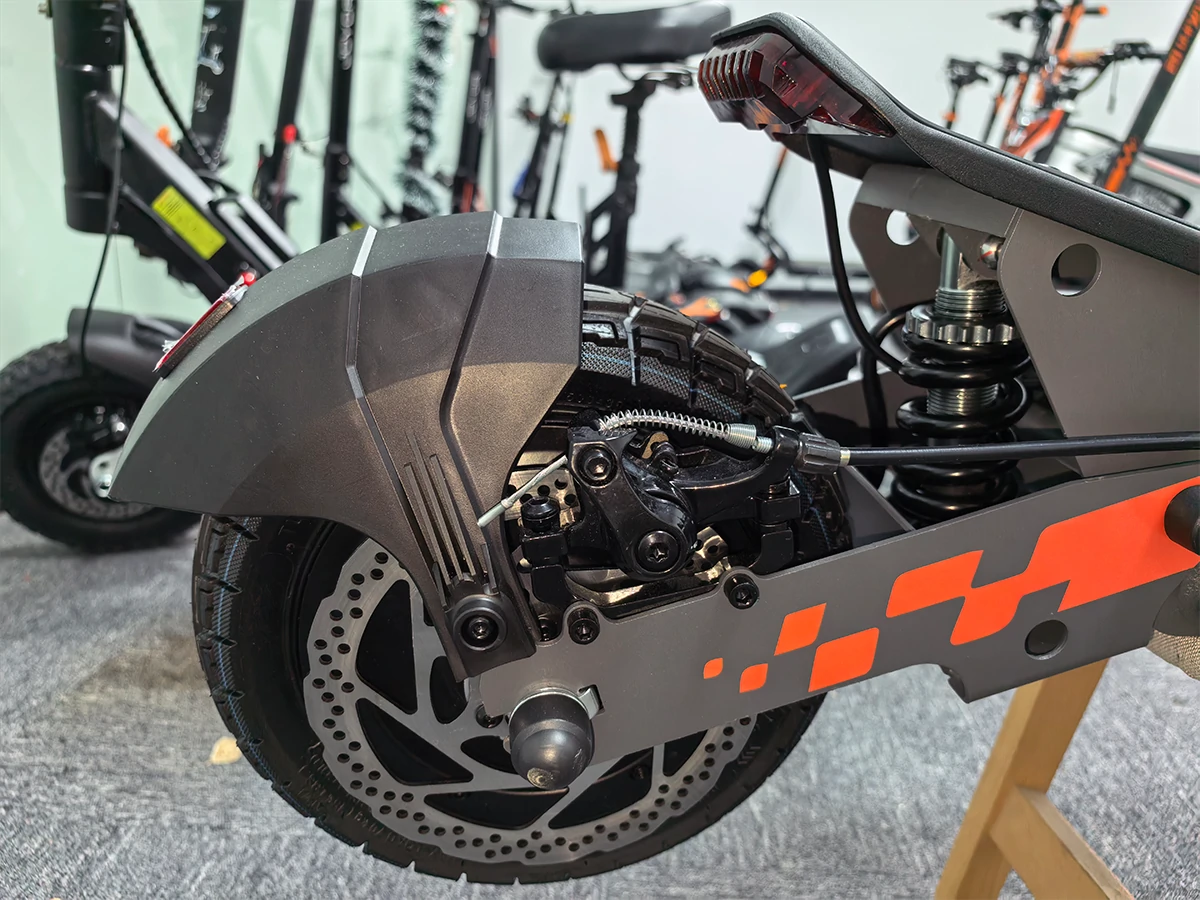

The G2 2026 Bracket Detail Matters
This is one of the details that changed between the older G2 and the 2026 version.
For the G2 2026 setup tested by XOD, the original KuKirin caliper bracket is reused. The original KuKirin bolts and metal washers are also reused.
At the front, the metal washer sits between the XOD H880 caliper and the original KuKirin bracket. This position is important because it affects the relationship between the caliper and the 160 mm rotor.
The older KuKirin G2 and the G2 2026 do not use the same caliper-bracket installation method. For the 2026 setup described here, reuse the original KuKirin bracket rather than the XOD-supplied bracket.
What About the Brake Sensor?
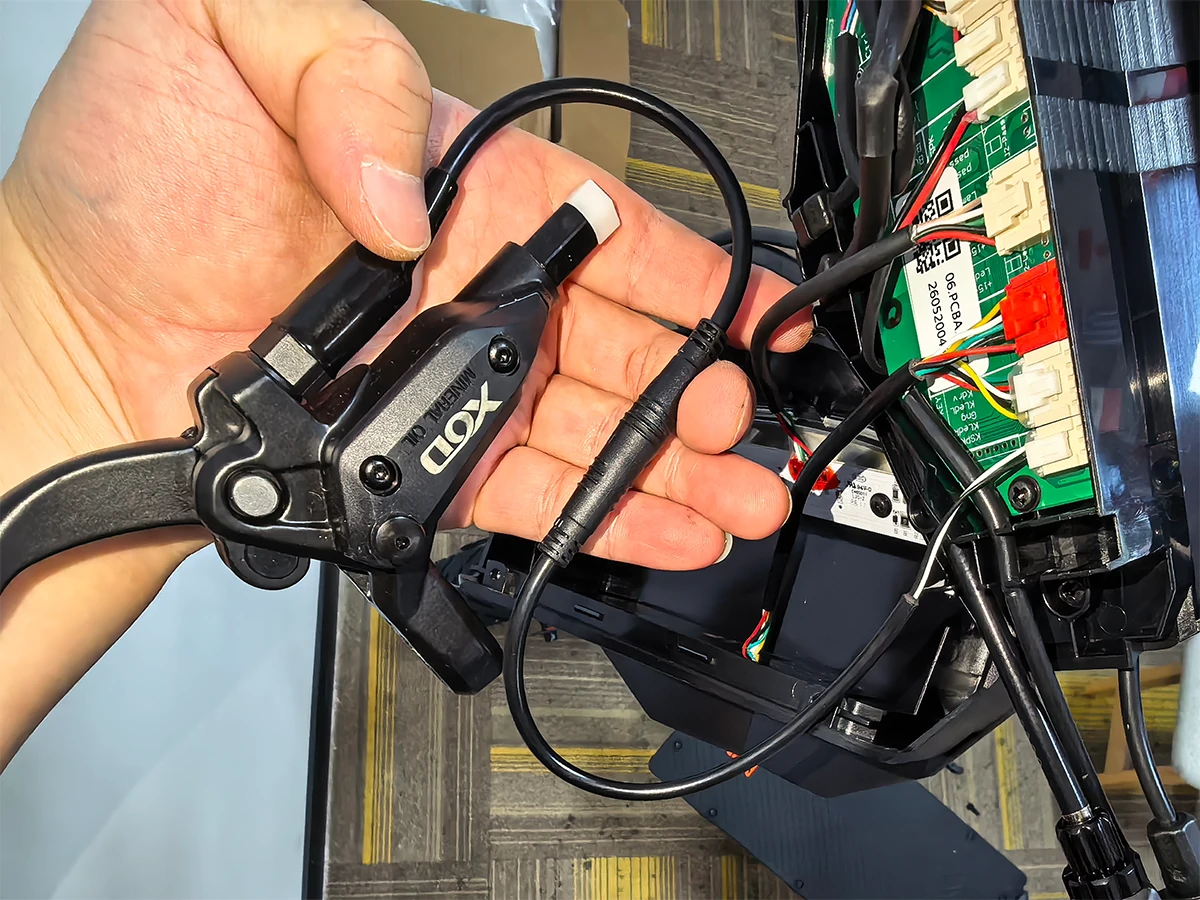
The XOD brake lever includes a motor power-off sensor, but the KuKirin G2 requires a dedicated adapter for the tested installation.
What We Observed After Installation
There was one small detail we noticed immediately after finishing the installation: a slight rubbing sound from the new brake pads.
In this particular G2 2026 test, the noise gradually became quieter and had largely disappeared after approximately 5 km of riding.
The important part is the context. The wheel was not experiencing severe drag, the brake was functioning normally, and the sound was getting better rather than worse. In this test, the initial noise was consistent with the new pads bedding in.
That does not mean every rubbing noise should be ignored for 5 km. If the wheel is hard to rotate, the rotor is strongly contacting the caliper, or the brake is getting unusually hot, stop and inspect the installation instead.
Older G2 vs. G2 2026: What Changed?
| Fitment Item | Older G2 | G2 2026 |
|---|---|---|
| Front XOD Caliper | H880 | H880 |
| Rear XOD Caliper | H800 | H800 |
| Front Rotor | 1.9 mm × 140 mm | 1.9 mm × 160 mm |
| Rear Rotor | 1.9 mm × 140 mm | 1.9 mm × 160 mm |
| Replacement Rotor | Not required | Not required |
| 4 mm Rotor Spacer | Front only | Front only |
| Caliper Bracket | XOD-supplied bracket | Original KuKirin bracket |
| Caliper Bolts | Original KuKirin | Original KuKirin |
| Metal Washers | Original KuKirin | Original KuKirin, between caliper and bracket |
| Sensor Adapter | Required | Required |
The main takeaway is simple: the H880/H800 combination remains the same in the tested setup, but the rotor size and mounting hardware arrangement are different between the two G2 generations.
Hydraulic Brake Rubbing FAQ
Why are my new hydraulic brakes rubbing?
Common causes include new brake pads bedding in, slight rotor misalignment, an off-center caliper, insufficient clearance, incorrect spacer or mounting hardware, a bent rotor, or an incorrect caliper installation.
Is it normal for new hydraulic brakes to rub?
A light and temporary rubbing sound can occur during the initial bedding-in period. It should not be confused with strong continuous rubbing, significant wheel resistance, abnormal heat or visible contact between the rotor and caliper.
How do I stop hydraulic disc brakes from rubbing?
First identify where the rubbing is coming from. Check rotor alignment, caliper position, rotor-to-caliper clearance, spacers, washers and the mounting bracket. Do not start replacing parts before identifying the actual cause.
Why is my brake rotor rubbing against the caliper?
The rotor may be misaligned, the caliper may not be centered, or the rotor may be positioned incorrectly because of the wrong spacer or mounting hardware. Check the complete installation rather than adjusting only one component.
Do new hydraulic brake pads need to bed in?
New pads normally need an initial bedding-in period before the friction surfaces fully settle. In the XOD KuKirin G2 2026 test, a light rubbing sound gradually disappeared after approximately 5 km. That was an observation from that specific installation, not a universal distance for every brake system.
Why are my electric scooter hydraulic brakes rubbing?
Electric scooters can have tight caliper and rotor clearances, different mounting layouts and model-specific spacers or brackets. Check the actual scooter configuration, rotor size, caliper position and mounting hardware.
Can a spacer fix hydraulic brake rubbing?
A correctly selected spacer can change the rotor position and provide the clearance required for a specific installation. It should only be used when the vehicle and brake configuration calls for it. Adding a spacer randomly is not a general fix for brake rubbing.
When should I stop riding because of brake rubbing?
Stop riding and inspect the brake if the wheel is difficult to rotate, the rotor is continuously pressing against the caliper, the brake becomes unusually hot, braking performance changes, hydraulic fluid leaks, or visible damage is present.
Not Sure Why Your Brake Is Rubbing?
If you are not sure whether the problem is the rotor, caliper, spacer or mounting hardware, do not guess. Send XOD your scooter model and clear photos of the front and rear brake setup. Photos of the brake-lever connector are also helpful when checking sensor compatibility.
Check Your XOD Brake FitmentBrake installation should be performed carefully and tested at low speed in a safe area before normal riding. If you are unsure about a brake installation, hydraulic connection or mounting configuration, have the system checked by an experienced bicycle or electric-scooter technician.